React 可以改变你对所查看的设计和构建的应用的思考方式。当你使用 React 构建用户界面时,首先会将其拆分成称为 组件 的部分。然后,你将描述每个组件的不同视觉状态。最后,你会将组件连接在一起,以便数据在它们之间流动。在本教程中,我们将带你了解构建可搜索产品数据表的 React 思维过程。
🌐 React can change how you think about the designs you look at and the apps you build. When you build a user interface with React, you will first break it apart into pieces called components. Then, you will describe the different visual states for each of your components. Finally, you will connect your components together so that the data flows through them. In this tutorial, we’ll guide you through the thought process of building a searchable product data table with React.
从模型开始
🌐 Start with the mockup
想象一下,你已经拥有一个 JSON API 和来自设计师的模型。
🌐 Imagine that you already have a JSON API and a mockup from a designer.
JSON API 返回一些如下所示的数据:
🌐 The JSON API returns some data that looks like this:
[
{ category: "Fruits", price: "$1", stocked: true, name: "Apple" },
{ category: "Fruits", price: "$1", stocked: true, name: "Dragonfruit" },
{ category: "Fruits", price: "$2", stocked: false, name: "Passionfruit" },
{ category: "Vegetables", price: "$2", stocked: true, name: "Spinach" },
{ category: "Vegetables", price: "$4", stocked: false, name: "Pumpkin" },
{ category: "Vegetables", price: "$1", stocked: true, name: "Peas" }
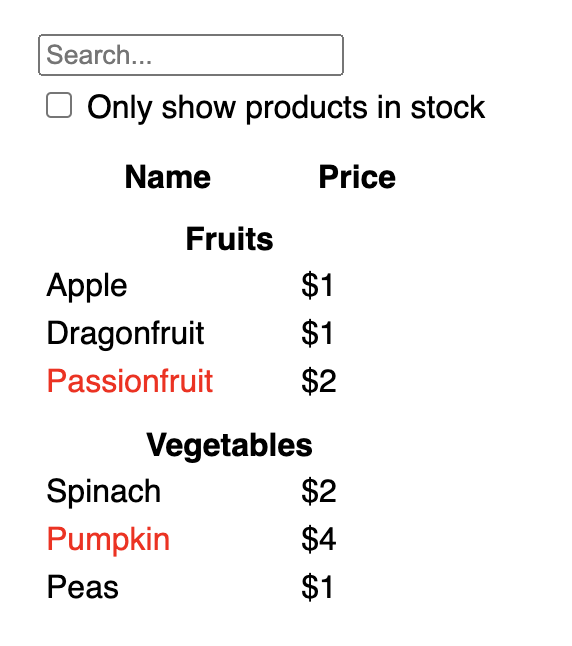
]模型看起来像这样:
🌐 The mockup looks like this:
要在 React 中实现 UI,你通常会遵循相同的五个步骤。
🌐 To implement a UI in React, you will usually follow the same five steps.
步骤 1:将用户界面拆分为组件层次结构
🌐 Step 1: Break the UI into a component hierarchy
首先在原型中的每个组件和子组件周围画框并给它们命名。如果你与设计师合作,他们可能已经在他们的设计工具中为这些组件命名了。问问他们吧!
🌐 Start by drawing boxes around every component and subcomponent in the mockup and naming them. If you work with a designer, they may have already named these components in their design tool. Ask them!
根据你的背景,你可以考虑以不同的方式将设计拆分为组件:
🌐 Depending on your background, you can think about splitting up a design into components in different ways:
- 编程——使用相同的技术来决定是否应该创建一个新的函数或对象。其中一种技术是关注点分离,也就是说,一个组件理想情况下应该只关注一件事。如果它最终变得庞大,就应该将其分解为更小的子组件。
- CSS——考虑你会为哪些内容创建类选择器。(不过,组件的粒度会稍微粗一些。)
- 设计——考虑如何组织设计的各个层次。
如果你的 JSON 结构良好,你会经常发现它自然地映射到你的 UI 组件结构上。这是因为 UI 和数据模型通常具有相同的信息架构——也就是说,相同的形状。将你的 UI 分成多个组件,每个组件对应数据模型中的一部分。
🌐 If your JSON is well-structured, you’ll often find that it naturally maps to the component structure of your UI. That’s because UI and data models often have the same information architecture—that is, the same shape. Separate your UI into components, where each component matches one piece of your data model.
此屏幕上有五个组件:
🌐 There are five components on this screen:
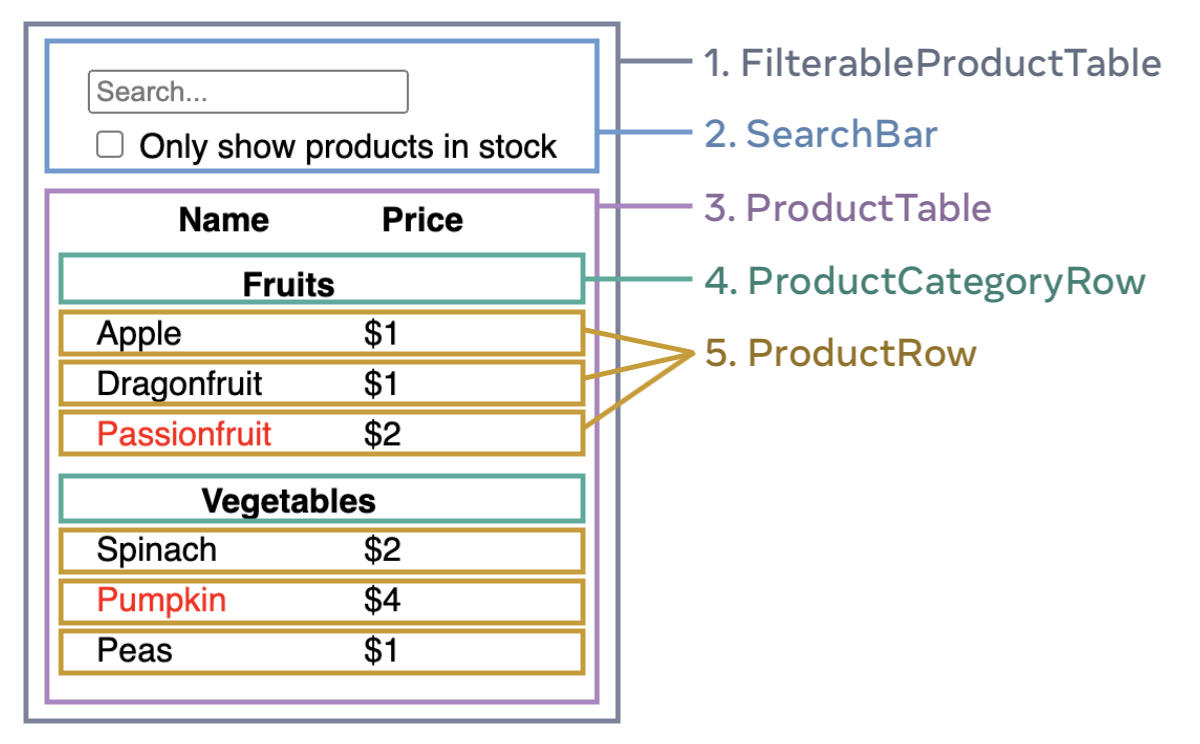
FilterableProductTable(灰色)包含整个应用。SearchBar(蓝色)接收用户输入。ProductTable(薰衣草)根据用户输入显示并筛选列表。ProductCategoryRow(绿色)显示每个类别的标题。ProductRow(黄色)为每个产品显示一行。
如果你看 ProductTable(薰衣草色),你会看到表头(包含“名称”和“价格”标签)不是它自己的组件。这取决于个人喜好,你可以选择任意方式。在这个例子中,它是 ProductTable 的一部分,因为它出现在 ProductTable 的列表内。然而,如果这个表头变得复杂(例如,如果你添加排序功能),你可以将其移到自己的 ProductTableHeader 组件中。
🌐 If you look at ProductTable (lavender), you’ll see that the table header (containing the “Name” and “Price” labels) isn’t its own component. This is a matter of preference, and you could go either way. For this example, it is a part of ProductTable because it appears inside the ProductTable’s list. However, if this header grows to be complex (e.g., if you add sorting), you can move it into its own ProductTableHeader component.
现在你已经识别出模型中的组件,将它们排列成一个层次结构。出现在模型中另一个组件内的组件应该在层次结构中作为子组件出现:
🌐 Now that you’ve identified the components in the mockup, arrange them into a hierarchy. Components that appear within another component in the mockup should appear as a child in the hierarchy:
FilterableProductTableSearchBarProductTableProductCategoryRowProductRow
步骤 2:在React中构建静态版本
🌐 Step 2: Build a static version in React
既然你已经有了组件层次结构,现在是时候实现你的应用了。最直接的方法是构建一个从数据模型呈现 UI 的版本,而暂时不添加任何交互功能!通常先构建静态版本然后再添加交互功能会更容易。构建静态版本需要大量的打字而不需要思考,但添加交互功能则需要大量思考而不需要太多打字。
🌐 Now that you have your component hierarchy, it’s time to implement your app. The most straightforward approach is to build a version that renders the UI from your data model without adding any interactivity… yet! It’s often easier to build the static version first and add interactivity later. Building a static version requires a lot of typing and no thinking, but adding interactivity requires a lot of thinking and not a lot of typing.
要构建呈现你的数据模型的应用的静态版本,你需要构建组件,这些组件可以重用其他组件并使用props传递数据。Props 是一种从父组件向子组件传递数据的方式。(如果你熟悉state的概念,对于构建这个静态版本的应用,完全不要使用 state。State 仅用于交互性,即随时间变化的数据。由于这是应用的静态版本,你不需要它。)
🌐 To build a static version of your app that renders your data model, you’ll want to build components that reuse other components and pass data using props. Props are a way of passing data from parent to child. (If you’re familiar with the concept of state, don’t use state at all to build this static version. State is reserved only for interactivity, that is, data that changes over time. Since this is a static version of the app, you don’t need it.)
你可以通过“自上而下”的方式构建,从层级较高的组件开始(例如 FilterableProductTable),也可以通过“自下而上”的方式构建,从层级较低的组件开始(例如 ProductRow)。在较简单的例子中,通常自上而下更容易,而在较大的项目中,自下而上更容易。
🌐 You can either build “top down” by starting with building the components higher up in the hierarchy (like FilterableProductTable) or “bottom up” by working from components lower down (like ProductRow). In simpler examples, it’s usually easier to go top-down, and on larger projects, it’s easier to go bottom-up.
function ProductCategoryRow({ category }) {
  return (
    <tr>
      <th colSpan="2">
        {category}
      </th>
    </tr>
  );
}

function ProductRow({ product }) {
  const name = product.stocked ? product.name :
    <span style={{ color: 'red' }}>
      {product.name}
    </span>;

  return (
    <tr>
      <td>{name}</td>
      <td>{product.price}</td>
    </tr>
  );
}

function ProductTable({ products }) {
  const rows = [];
  let lastCategory = null;

  products.forEach((product) => {
    if (product.category !== lastCategory) {
      rows.push(
        <ProductCategoryRow
          category={product.category}
          key={product.category} />
      );
    }
    rows.push(
      <ProductRow
        product={product}
        key={product.name} />
    );
    lastCategory = product.category;
  });

  return (
    <table>
      <thead>
        <tr>
          <th>Name</th>
          <th>Price</th>
        </tr>
      </thead>
      <tbody>{rows}</tbody>
    </table>
  );
}

function SearchBar() {
  return (
    <form>
      <input type="text" placeholder="Search..." />
      <label>
        <input type="checkbox" />
        {' '}
        Only show products in stock
      </label>
    </form>
  );
}

function FilterableProductTable({ products }) {
  return (
    <div>
      <SearchBar />
      <ProductTable products={products} />
    </div>
  );
}

const PRODUCTS = [
  {category: "Fruits", price: "$1", stocked: true, name: "Apple"},
  {category: "Fruits", price: "$1", stocked: true, name: "Dragonfruit"},
  {category: "Fruits", price: "$2", stocked: false, name: "Passionfruit"},
  {category: "Vegetables", price: "$2", stocked: true, name: "Spinach"},
  {category: "Vegetables", price: "$4", stocked: false, name: "Pumpkin"},
  {category: "Vegetables", price: "$1", stocked: true, name: "Peas"}
];

export default function App() {
  return <FilterableProductTable products={PRODUCTS} />;
}
(如果这段代码看起来令人畏惧,请先查看快速入门!)
在构建组件之后,你将拥有一个可重用组件的库,这些组件用来渲染你的数据模型。因为这是一个静态应用,组件只会返回 JSX。层级最顶层的组件(FilterableProductTable)将会把你的数据模型作为 prop 接收。这被称为 单向数据流,因为数据从顶层组件流向树底部的组件。
🌐 After building your components, you’ll have a library of reusable components that render your data model. Because this is a static app, the components will only return JSX. The component at the top of the hierarchy (FilterableProductTable) will take your data model as a prop. This is called one-way data flow because the data flows down from the top-level component to the ones at the bottom of the tree.
步骤 3:找到UI状态的最小但完整的表示
🌐 Step 3: Find the minimal but complete representation of UI state
为了让用户界面具有交互性,你需要让用户能够更改你的底层数据模型。你将为此使用状态。
🌐 To make the UI interactive, you need to let users change your underlying data model. You will use state for this.
将状态视为你的应用需要记住的最小变化数据集。构建状态的最重要原则是保持DRY(不要重复自己)。找出应用所需状态的最小表示,然后按需计算其他所有内容。例如,如果你在构建一个购物清单,可以将项目存储为状态中的数组。如果你还想显示清单中项目的数量,不要将项目数量存储为另一个状态值——而是读取数组的长度。
🌐 Think of state as the minimal set of changing data that your app needs to remember. The most important principle for structuring state is to keep it DRY (Don’t Repeat Yourself). Figure out the absolute minimal representation of the state your application needs and compute everything else on-demand. For example, if you’re building a shopping list, you can store the items as an array in state. If you want to also display the number of items in the list, don’t store the number of items as another state value—instead, read the length of your array.
现在想想这个示例应用中的所有数据片段:
🌐 Now think of all of the pieces of data in this example application:
- 原始产品清单
- 用户输入的搜索文本
- 复选框的值
- 过滤后的产品列表
以下哪些是状态?请指出不是状态的:
🌐 Which of these are state? Identify the ones that are not:
- 它随时间保持不变吗?如果是这样,它就不是状态。
- 它是通过 props 从父组件传入的吗?如果是的话,它就不是状态。
- 你能基于组件中现有的 state 或 props 计算它吗?如果可以,它 绝对 不是 state!
剩下的可能是状态。
🌐 What’s left is probably state.
让我们再一一过一遍:
🌐 Let’s go through them one by one again:
- 原始的产品列表是作为 props 传入的,所以它不是 state。
- 搜索文本似乎是状态,因为它会随着时间的推移而变化,并且无法从任何东西中计算出来。
- 复选框的值似乎是状态,因为它会随着时间的推移而变化,并且无法从任何东西中计算出来。
- 筛选后的产品列表不是状态,因为它可以通过获取原始产品列表并根据搜索文本和复选框的值进行筛选来计算。
这意味着只有搜索文本和复选框的值才是状态!干得好!
🌐 This means only the search text and the value of the checkbox are state! Nicely done!
深入研究
🌐 Props vs State
在 React 中有两种类型的“模型”数据:props 和 state。这两者有很大的不同:
🌐 There are two types of “model” data in React: props and state. The two are very different:
- Props 就像你传递给函数的参数。它们允许父组件将数据传递给子组件,并自定义子组件的外观。例如,一个
Form可以将colorprop 传递给Button。 - 状态就像组件的记忆。 它让组件能够跟踪一些信息,并根据交互进行更改。例如,一个
Button可能会跟踪isHovered的状态。
Props 和 state 是不同的,但它们可以协同工作。父组件通常会将一些信息保存在 state 中(这样它可以更改这些信息),并传递给子组件作为它们的 props。如果第一次阅读时这种区别仍然感觉模糊,也没有关系。它需要一些练习才能真正掌握!
🌐 Props and state are different, but they work together. A parent component will often keep some information in state (so that it can change it), and pass it down to child components as their props. It’s okay if the difference still feels fuzzy on the first read. It takes a bit of practice for it to really stick!
步骤 4:确定你的状态应该存放的位置
🌐 Step 4: Identify where your state should live
在确定了应用的最小状态数据后,你需要确定哪个组件负责更改此状态,或者说 拥有 这个状态。请记住:React 使用单向数据流,将数据从父组件传递到子组件。具体哪个组件应该拥有哪个状态可能并不立即清楚。如果你是这个概念的新手,这可能会有挑战,但你可以通过以下步骤来弄清楚!
🌐 After identifying your app’s minimal state data, you need to identify which component is responsible for changing this state, or owns the state. Remember: React uses one-way data flow, passing data down the component hierarchy from parent to child component. It may not be immediately clear which component should own what state. This can be challenging if you’re new to this concept, but you can figure it out by following these steps!
对于应用中的每个状态:
🌐 For each piece of state in your application:
- 识别根据该状态渲染某物的每个组件。
- 找到它们最接近的公共父组件 - 在层次结构中高于它们的组件。
- 决定状态应该在哪里:
- 通常,你可以将状态直接放入它们的共同父级中。
- 你还可以将状态放入其共同父级之上的某个组件中。
- 如果你找不到一个组件在其中对拥有状态有意义,请创建一个新组件专门用于保存状态并将其添加到公共父组件之上的层次结构中的某个位置。
在上一步中,你在这个应用中找到了两个状态:搜索输入文本和复选框的值。在这个示例中,它们总是一起出现,所以把它们放在同一个地方是有意义的。
🌐 In the previous step, you found two pieces of state in this application: the search input text, and the value of the checkbox. In this example, they always appear together, so it makes sense to put them into the same place.
现在让我们为他们制定策略:
🌐 Now let’s run through our strategy for them:
- 识别使用状态的组件:
ProductTable需要根据该状态(搜索文本和复选框值)筛选产品列表。SearchBar需要显示该状态(搜索文本和复选框值)。
- 找到它们的共同父组件: 两个组件共有的第一个父组件是
FilterableProductTable。 - 决定状态存放位置:我们会将过滤器文本和选中状态的值保存在
FilterableProductTable中。
所以状态值将存放在 FilterableProductTable 中。
🌐 So the state values will live in FilterableProductTable.
使用 useState() Hook 向组件添加状态。Hook 是特殊的函数,允许你“钩入” React。在 FilterableProductTable 的顶部添加两个状态变量,并指定它们的初始状态:
🌐 Add state to the component with the useState() Hook. Hooks are special functions that let you “hook into” React. Add two state variables at the top of FilterableProductTable and specify their initial state:
function FilterableProductTable({ products }) {
  const [filterText, setFilterText] = useState('');
  const [inStockOnly, setInStockOnly] = useState(false);
然后,将 filterText 和 inStockOnly 作为 props 传递给 ProductTable 和 SearchBar:
🌐 Then, pass filterText and inStockOnly to ProductTable and SearchBar as props:
<div>
  <SearchBar
    filterText={filterText}
    inStockOnly={inStockOnly} />
  <ProductTable
    products={products}
    filterText={filterText}
    inStockOnly={inStockOnly} />
</div>
你可以开始查看你的应用将如何表现。在下面的沙盒代码中,将 filterText 的初始值从 useState('') 修改为 useState('fruit')。你将看到搜索输入文本和表格都会更新:
🌐 You can start seeing how your application will behave. Edit the filterText initial value from useState('') to useState('fruit') in the sandbox code below. You’ll see both the search input text and the table update:
import { useState } from 'react';

function FilterableProductTable({ products }) {
  const [filterText, setFilterText] = useState('');
  const [inStockOnly, setInStockOnly] = useState(false);

  return (
    <div>
      <SearchBar
        filterText={filterText}
        inStockOnly={inStockOnly} />
      <ProductTable
        products={products}
        filterText={filterText}
        inStockOnly={inStockOnly} />
    </div>
  );
}

function ProductCategoryRow({ category }) {
  return (
    <tr>
      <th colSpan="2">
        {category}
      </th>
    </tr>
  );
}

function ProductRow({ product }) {
  const name = product.stocked ? product.name :
    <span style={{ color: 'red' }}>
      {product.name}
    </span>;

  return (
    <tr>
      <td>{name}</td>
      <td>{product.price}</td>
    </tr>
  );
}

function ProductTable({ products, filterText, inStockOnly }) {
  const rows = [];
  let lastCategory = null;

  products.forEach((product) => {
    if (
      product.name.toLowerCase().indexOf(
        filterText.toLowerCase()
      ) === -1
    ) {
      return;
    }
    if (inStockOnly && !product.stocked) {
      return;
    }
    if (product.category !== lastCategory) {
      rows.push(
        <ProductCategoryRow
          category={product.category}
          key={product.category} />
      );
    }
    rows.push(
      <ProductRow
        product={product}
        key={product.name} />
    );
    lastCategory = product.category;
  });

  return (
    <table>
      <thead>
        <tr>
          <th>Name</th>
          <th>Price</th>
        </tr>
      </thead>
      <tbody>{rows}</tbody>
    </table>
  );
}

function SearchBar({ filterText, inStockOnly }) {
  return (
    <form>
      <input
        type="text"
        value={filterText}
        placeholder="Search..."/>
      <label>
        <input
          type="checkbox"
          checked={inStockOnly} />
        {' '}
        Only show products in stock
      </label>
    </form>
  );
}

const PRODUCTS = [
  {category: "Fruits", price: "$1", stocked: true, name: "Apple"},
  {category: "Fruits", price: "$1", stocked: true, name: "Dragonfruit"},
  {category: "Fruits", price: "$2", stocked: false, name: "Passionfruit"},
  {category: "Vegetables", price: "$2", stocked: true, name: "Spinach"},
  {category: "Vegetables", price: "$4", stocked: false, name: "Pumpkin"},
  {category: "Vegetables", price: "$1", stocked: true, name: "Peas"}
];

export default function App() {
  return <FilterableProductTable products={PRODUCTS} />;
}
请注意,编辑表单尚未起作用。上方沙箱中有一个控制台错误,解释了原因:
🌐 Notice that editing the form doesn’t work yet. There is a console error in the sandbox above explaining why:
在上面的沙箱中,ProductTable 和 SearchBar 读取 filterText 和 inStockOnly 属性来渲染表格、输入框和复选框。例如,下面是 SearchBar 填充输入值的方式:
🌐 In the sandbox above, ProductTable and SearchBar read the filterText and inStockOnly props to render the table, the input, and the checkbox. For example, here is how SearchBar populates the input value:
function SearchBar({ filterText, inStockOnly }) {
  return (
    <form>
      <input
        type="text"
        value={filterText}
        placeholder="Search..."/>
然而,你还没有添加任何代码来响应用户的操作,比如输入。这将是你的最后一步。
🌐 However, you haven’t added any code to respond to the user actions like typing yet. This will be your final step.
步骤 5:添加反向数据流
🌐 Step 5: Add inverse data flow
目前你的应用可以正确渲染,属性和状态按照层级向下流动。但要根据用户输入更改状态,你需要支持数据向反方向流动:层级深处的表单组件需要更新 FilterableProductTable 中的状态。
🌐 Currently your app renders correctly with props and state flowing down the hierarchy. But to change the state according to user input, you will need to support data flowing the other way: the form components deep in the hierarchy need to update the state in FilterableProductTable.
React 使这种数据流显式化,但它比双向数据绑定需要更多的输入。如果你尝试在上面的示例中输入或勾选框,你会看到 React 会忽略你的输入。这是有意的。通过编写 <input value={filterText} />,你已经将 input 的 value 属性设置为始终等于从 FilterableProductTable 传入的 filterText 状态。由于 filterText 状态从未被设置,输入永远不会改变。
🌐 React makes this data flow explicit, but it requires a little more typing than two-way data binding. If you try to type or check the box in the example above, you’ll see that React ignores your input. This is intentional. By writing <input value={filterText} />, you’ve set the value prop of the input to always be equal to the filterText state passed in from FilterableProductTable. Since filterText state is never set, the input never changes.
你希望在用户更改表单输入时,状态能够更新以反映这些变化。状态由 FilterableProductTable 拥有,所以只有它可以调用 setFilterText 和 setInStockOnly。为了让 SearchBar 更新 FilterableProductTable 的状态,你需要将这些函数传递给 SearchBar:
🌐 You want to make it so whenever the user changes the form inputs, the state updates to reflect those changes. The state is owned by FilterableProductTable, so only it can call setFilterText and setInStockOnly. To let SearchBar update the FilterableProductTable’s state, you need to pass these functions down to SearchBar:
function FilterableProductTable({ products }) {
  const [filterText, setFilterText] = useState('');
  const [inStockOnly, setInStockOnly] = useState(false);

  return (
    <div>
      <SearchBar
        filterText={filterText}
        inStockOnly={inStockOnly}
        onFilterTextChange={setFilterText}
        onInStockOnlyChange={setInStockOnly} />
在 SearchBar 内,你将添加 onChange 事件处理程序,并从它们设置父级状态:
🌐 Inside the SearchBar, you will add the onChange event handlers and set the parent state from them:
function SearchBar({
  filterText,
  inStockOnly,
  onFilterTextChange,
  onInStockOnlyChange
}) {
  return (
    <form>
      <input
        type="text"
        value={filterText}
        placeholder="Search..."
        onChange={(e) => onFilterTextChange(e.target.value)}
      />
      <label>
        <input
          type="checkbox"
          checked={inStockOnly}
          onChange={(e) => onInStockOnlyChange(e.target.checked)}
现在应用完全可以工作了!
🌐 Now the application fully works!
import { useState } from 'react';

function FilterableProductTable({ products }) {
  const [filterText, setFilterText] = useState('');
  const [inStockOnly, setInStockOnly] = useState(false);

  return (
    <div>
      <SearchBar
        filterText={filterText}
        inStockOnly={inStockOnly}
        onFilterTextChange={setFilterText}
        onInStockOnlyChange={setInStockOnly} />
      <ProductTable
        products={products}
        filterText={filterText}
        inStockOnly={inStockOnly} />
    </div>
  );
}

function ProductCategoryRow({ category }) {
  return (
    <tr>
      <th colSpan="2">
        {category}
      </th>
    </tr>
  );
}

function ProductRow({ product }) {
  const name = product.stocked ? product.name :
    <span style={{ color: 'red' }}>
      {product.name}
    </span>;

  return (
    <tr>
      <td>{name}</td>
      <td>{product.price}</td>
    </tr>
  );
}

function ProductTable({ products, filterText, inStockOnly }) {
  const rows = [];
  let lastCategory = null;

  products.forEach((product) => {
    if (
      product.name.toLowerCase().indexOf(
        filterText.toLowerCase()
      ) === -1
    ) {
      return;
    }
    if (inStockOnly && !product.stocked) {
      return;
    }
    if (product.category !== lastCategory) {
      rows.push(
        <ProductCategoryRow
          category={product.category}
          key={product.category} />
      );
    }
    rows.push(
      <ProductRow
        product={product}
        key={product.name} />
    );
    lastCategory = product.category;
  });

  return (
    <table>
      <thead>
        <tr>
          <th>Name</th>
          <th>Price</th>
        </tr>
      </thead>
      <tbody>{rows}</tbody>
    </table>
  );
}

function SearchBar({
  filterText,
  inStockOnly,
  onFilterTextChange,
  onInStockOnlyChange
}) {
  return (
    <form>
      <input
        type="text"
        value={filterText} placeholder="Search..."
        onChange={(e) => onFilterTextChange(e.target.value)} />
      <label>
        <input
          type="checkbox"
          checked={inStockOnly}
          onChange={(e) => onInStockOnlyChange(e.target.checked)} />
        {' '}
        Only show products in stock
      </label>
    </form>
  );
}

const PRODUCTS = [
  {category: "Fruits", price: "$1", stocked: true, name: "Apple"},
  {category: "Fruits", price: "$1", stocked: true, name: "Dragonfruit"},
  {category: "Fruits", price: "$2", stocked: false, name: "Passionfruit"},
  {category: "Vegetables", price: "$2", stocked: true, name: "Spinach"},
  {category: "Vegetables", price: "$4", stocked: false, name: "Pumpkin"},
  {category: "Vegetables", price: "$1", stocked: true, name: "Peas"}
];

export default function App() {
  return <FilterableProductTable products={PRODUCTS} />;
}
你可以在 添加交互性 部分学习有关处理事件和更新状态的所有内容。
🌐 You can learn all about handling events and updating state in the Adding Interactivity section.
从这往哪儿走
🌐 Where to go from here
这是关于如何使用 React 构建组件和应用的一个非常简短的介绍。你现在可以开始一个 React 项目,或者深入了解本教程中使用的所有语法。
🌐 This was a very brief introduction to how to think about building components and applications with React. You can start a React project right now or dive deeper on all the syntax used in this tutorial.